Destratification Fans – The Ins And Outs
Destratification fans, the ins and outs.
As the United Kingdom now start to head back into the winter months the cold begins to draw in. Many people will be looking at there heating schemes and ways to save money.
With fuel prices escalating, bills will be higher for sure.
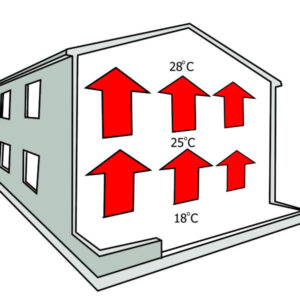
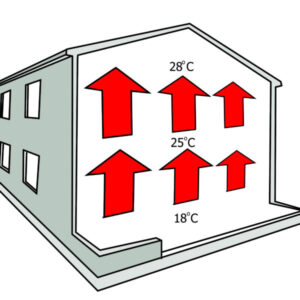
Heat rises plain and simple. Factory heating blows jets of warm air across the workers and rises to the roof. It mingles in layers.
The layers of heat are warmest at the top and coldest at the bottom. That’s inconvenient when your working at the bottom.
Your building heats from the top down. As air is warmed and its molecules vibrate, they displace from the colder surrounding air and rise upwards.
Without good air circulation, these thermodynamic layers cause heat gradients which become greater with room size.
But gradients of 10 ˚C and higher can form which is wasteful.
Destratification removes these layers by mixing the air back together.
So what is a destratification fan?
A destratification fan is simply a fan in a box.
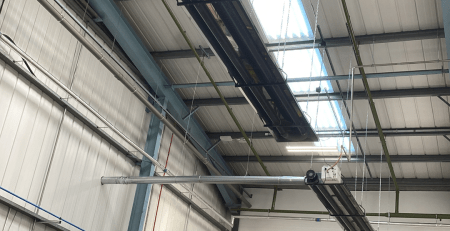
Fixing a destratification fan at the top of the building blows the warmer air back to the floor and this makes the heat useful again.
As a result air movement mixes the air and lowers the temperature gradients.
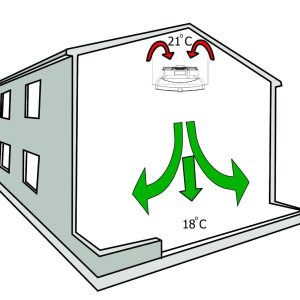
Because a destratification fan is now running and the temperature gradients are lowered, less heat energy is required to heat the building.
Choosing A Destratification Fan
I’m going to explain how to work out the basic maths behind choosing a destratification fan.
Firstly we need to know the size of the room. Carefully measure the length, width and the height of the room because we will need these to work out the room volume.
Secondly, simply multiply the length, width and the height together to get a volume in M³.
And finally, multiply the volume in M³ by 2 to get the perfect air volume.
The key to choosing the right fan is to make sure you don’t have to many or to little fans. A little common sense goes a long way.
A small building for instance will probably need smaller less powerful fans but a large building may need larger more powerful fans.
There are quite a few manufacturers of destratification fans and a good choice is available to fit most projects.
But don’t forget here it is a fan in a box! Try to ignore the expensive one because its your favourite colour. Are you going to look at it daily with binoculars because its fifteen metres in the air?
Data Sheet
Its time to look at the manufacturers data sheet. You are over the shape and the colour its time to get down to business and consider air flow.
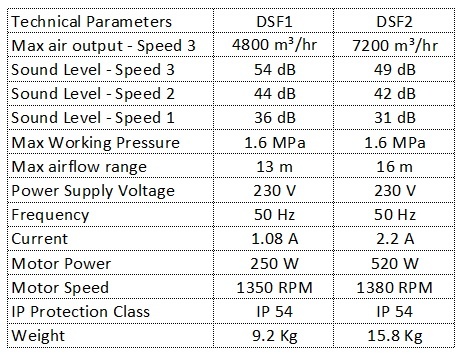
Take a look at the information above. This is for our range of destratification fans. Well did you think I was going to talk about someone else’s?
The very first line of the information shows the magic number. Maximum airflow in M³ / hour.
If the fan was to run non stop for one hour, this is the amount of air it will move.
Fan Selection
And now its back to mathematics again, but keep following Ill do all the hard work for you.
A small engineering workshop is 20m long, 15m wide and 7m high.
We need an airflow of 20 * 15 * 7 * 2 which is 4,200 M³ / hour.
It would make good sense here to select one DFS1 destratification fan as the maximum air output it 4,800 M³ / hour.
But what about a large manufacturing workshop for instance?
A scaffold manufacturer has a workshop that is 50m long, 35m wide and 15m high.
We would need an airflow of 50 * 35 * 15 * 2 which is 52,500 M³ / hour.
Wow, that’s a lot of air! And now a little more mathematics.
Well its quite simple really so here is how to do it.
Take the room airflow and divide it by that of the fans.
52,500 M³/h divided by 4800 = 10.9, round up so 11 DSF1 fans.
52,500 M³/h divided by 7200 = 7.2, round down so 7 DSF2 fans.
You can see that here, using the larger DFS2 fan would make more sense.
How To Install The Fans?
So you now know how many fans you need and have chosen the right ones. You ignored the colour and the shape but how do these hang?
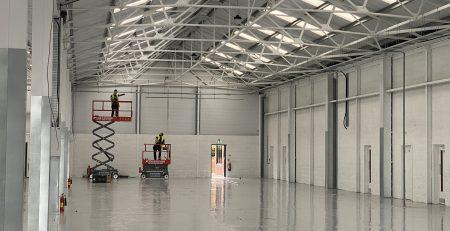
First you need to hang them in the roof. You might be lucky enough to have a scaffold tower or cargo step which can safely get you to the roof beams.
But the reality is, you are going to need some kind of access equipment to get you and the fan right up into that Apex.
The destratification fan needs to be mounted as high up as you can, because that’s where all the warmest air is.
Suspend the fan about half a meter from the highest point of the building with a good clear view of the ground below.
If you put the fan above some warehouse racking its probably not going to do you much good here.
Fixing Kits
Use a good solid fixing system because these fans are heavy! The last thing you want is for them to fall from the roof because you only had a roll of wet string on hand at the time.
If you decide to use our range of destratification fans we supply a fixing kit to make life easy. Firstly they are made from steel wire and can take the weight. Secondly they are so easy to fit and look very neat. Thirdly they can suit just about all installation methods.
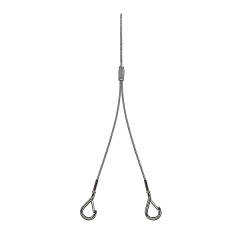
Simply slide the Gripple over the long wire, wrap it over a beam and pass it back through the gripple.
Now fix the second fixing in the same way, leaving a destratification fans width away.
Now attach the snap lock onto the fans fixings and there you have it. Level it up with a spirit level so its hanging straight and level.
DONT try and suspend a destratification fan from just one fixing point in the air. It will spin out of control like something straight out of a horror movie!
Wiring
I said earlier our range of Destratification Fans was simple and easy to install and its no different when it comes to the wiring.
We already pre-wired the fan for you and give you one an a half metres of flexible cable straight from the box.
Cable tie the wiring along the closest gripple and keep it neat, you want a professional looking job here.
Fix a switch fused spur into the roof using some suitable fixings. To comply with electrical regulations you need a point of isolation.
If you ever need to work on the fan again, its handy to be able to turn it off when you are fifteen metres in the air. Change the fuse in the spur to suit the fan current.
We include a metal clad spur in our fixing kits so we already have that covered for you. We even gave you some stuffing glands for the cable as well and the right fuse rating.
Provide a suitable power cable back down to the ground to your nearest circuit breaker box.
You should install a switch that can be easily accessed because during the summer months, you will probably want to turn the fans off.
And one last thing your work must comply with BS 7671. Personally you should ask a fully qualified electrician to help with the wiring.
Setting The Temperature
If you purchased a good quality destratification fan like ours, it will already have a thermostat fitted.
We fit a genuine Honeywell thermostat for long life and reliability.
To make the fans work correctly, the thermostat is actually wired as a cooling load.
Hear me out, it works backwards and can be a bit confusing.
To test the fan, turn the thermostat temperature down and the fan should spark into life, feel the air blowing downwards amazing huh?
Now turn the thermostat back up again and set it about three degrees above your heater temperature setting.
When your heater starts up the room will be cold.
As the roof space starts to heat up, the thermostat will activate because of the rising warm air.
The fan will start up and begin to blow the warm air in the roof back down to the floor again.
But as soon as the useful heat has gone, the fan will turn off again.
Noise
Destratification fans are noisy because that’s what happens when you blow and move air around.
You can see how noisy they are by looking at the manufacturers data sheet. We show you how noisy ours are in Decibels (dB).
After frantically looking at brochures and specification sheets you probably realised we show three Decibel levels for each of our fans?
That’s because our electric fan motors have three speed settings. They are called multi wound motors,
Firstly not all destratification fans suit every application. We can do all the mathematics, all the planning and you might still have a problem.
Secondly as an extra bonus, by changing a single wire inside our fan motor terminal box, you can adjust the motor speed from high to medium or even low.
They still work and do the job at hand, but can really help during commissioning to leave you customer smiling when you leave site.
Maybe you need just a little less airflow over a packaging area for instance.
The opportunity is there and built in at no extra cost.
Our fans are made from EPP which offers some sound deadening and they don’t squeak and vibrate like some of our competitors metal box versions.
I have to say they do look pretty cool and slick.
Do They Save You Money On Your Energy Bills?
Well yes they do. Firstly removing those temperature gradients we spoke about earlier means you use less energy. Secondly using less energy means you spend less money to buy it.
We cant state exactly how much money you will save because everyone’s buildings and use cases will be different.
Over the years we have supplied and installed hundreds of destratification fans and the feedback has always been positive.
Finishing Up
I hope you enjoyed reading this article as much as I did writing it.
If you are looking for a good quality destratification fan, then please get in contact with us. Ill help you out with all the mathematics and fan selection so you don’t have to bother.
You can head over to our online store and purchase directly from us by following the link below.
View our range of Destratification Fans at hamermechanical.co.uk or call us on 01543 721101.
Take care and keep yourself warm this winter!
Philip Hamer – Hamer Mechanical Services
29th October 2021 09:32

